Delicious Recipes for Your Thanksgiving Meal
Needing help planning your Thanksgiving meal or just need a simple and new recipe? We’ve got you covered! Here are some recipes to get you through every course of Thanksgiving.

Turkey
Source
Ingredients:
- 1 10-24 lb frozen turkey, thawed
- 1-2 Tbs Organics Extra Virgin Olive Oil
- Kosher Salt
- Pepper
Instructions:
- Remove and discard truss that holds turkey legs together. Pull or trim off and discard any excess fat in neck or body cavity. Remove giblets and neck.
- Rinse turkey inside and out with warm water. Pat dry with paper towels.
- Place the adjustable V-shaped rack in a 13 x 16 x 3-inch roasting pan (set rack sides so the bird is a minimum of 2 inches from pan bottom).
- Rub turkey skin generously all over with olive oil and sprinkle with salt and pepper. Set bird breast-side-up on rack. Pull wings away from body, then firmly twist them to push the wing tips under the bird.
- Using aluminum foil, form caps over the tips of the end of each drumstick. If any parts of the turkey extend beyond pan rim, fashion a foil collar underneath to make sure drippings flow back into pan. Do not tie legs together, add stuffing, or close body cavity.
- Insert an oven-safe meat thermometer near the center of the breast through thickest part until the tip touches bone, which is most accurate spot to check doneness.
Verify oven temperature and set pan on the lowest rack in a 475° oven
- Roast until thermometer reaches 160°. Halfway through roasting time, rotate pan in oven to assure even cooking and browning. If areas on turkey breast start to get browner than you like, lay a piece of foil over the dark areas.
- Remove pan from oven, set in a warm spot, and loosely cover pan with foil to keep it warm. Rearrange oven racks to accommodate potatoes and dressing.
Decrease oven temperature to 400º.
- Let turkey rest 30 to 60 minutes. The resting period will allow the internal temperature to reach 165°, the USDA safe cooking temperature for poultry.
- Drain juices from body cavity (often plentiful in unstuffed birds) into roasting pan. Transfer turkey to a platter or rimmed cutting board. Set aside juices for gravy.
- Cut off turkey legs at thigh joint. If joint is red or pink, return legs to the oven for 3 to 5 minutes (at 300° to 475°) or heat in a microwave oven for 3 to 4 minutes. Carve the rest of the turkey. Carving juices may be clear to pink or rosy; both are fine. Save juices to pour into gravy if desired.
Sides

Roasted Green Beans with Cranberries and Walnuts
Source
Ingredients:
- 2 pounds fresh green beans, stem ends trimmed
- 4 cloves garlic, peeled and sliced into quarters
- 2 tablespoons extra virgin olive oil
- 1-1/4 teaspoons kosher salt
- 1/2 teaspoon ground black pepper
- 1/4 teaspoon sugar
- 1 teaspoon lemon zest, from one lemon
- 2 teaspoons lemon juice, from one lemon
- 1/2 cup dried cranberries
- 1/2 cup walnuts (toasted if desired; see note)
Instructions:
Preheat the oven to 450 degrees.
- Line a rimmed baking sheet with heavy duty aluminum foil.
- Toss green beans with garlic, olive oil, salt, pepper and sugar directly on the prepared baking sheet. Roast the beans for 15 minutes, then stir with a spatula to promote even cooking. Continue roasting until beans are tender, slightly browned and just starting to shrivel, about 10 minutes more. Add lemon zest, lemon juice, cranberries and walnuts and toss well. Taste and adjust seasoning with salt, pepper and more lemon juice if desired.
- Note: To toast the walnuts, bake them on a sheet pan in a 350 degree oven until fragrant, about 10 minutes.
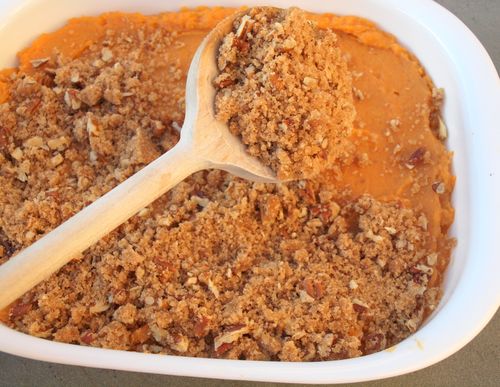
Sweet Potato Pecan Crisp
Source
Ingredients:
For the Sweet Potato Mixture:
- 3 pounds sweet potatoes (about 3 large), peeled and cut into 2-inch chunks
- 1/4 cup (1/2 stick) unsalted butter, melted
- 3/4 teaspoon salt
- 1/2 cup packed light brown sugar
- 2 large eggs, lightly beaten
- 1/8 teaspoon nutmeg
For the Topping:
- 1/4 cup (1/2 stick) unsalted butter
- 1 cup packed light brown sugar
- 1/3 cup flour
- 1 teaspoon cinnamon
- 1 cup pecans, coarsely chopped
Instructions:
Preheat the oven to 350 degrees.
- Bring a large pot of water to a boil. Add the sweet potatoes and cook until soft and tender, 20 – 25 minutes. Drain and let cool.
- In the meantime, make the topping: Melt the butter in a small pan over low heat. Off the heat, add the brown sugar, flour, and cinnamon and mix until well combined. It should look a little lumpy. Stir in the chopped nuts.
- In a large bowl, mash the sweet potatoes with a large fork until very smooth. Add the remaining sweet potato mixture ingredients and mix well. Set aside.
- Place the sweet potato mixture in a 2-quart baking dish. Spread the topping evenly over the sweet potato mixture and bake for about 40 minutes, or until the topping is nicely browned. Let cool slightly before serving.

Parmesan Smashed Potatoes
Source
Ingredients:
- 2 pounds baby red potatoes, sliced in half (they should all be about the same size so they cook evenly)
- 6 tablespoons unsalted butter, cut into tablespoons
- 1/2 cup grated Parmigiano-Reggiano
- 3/4 teaspoon salt
- 1/2 teaspoon ground black pepper
- 1 teaspoon fresh chives, finely chopped (optional)
Instructions:
- Bring large pot of salted water to a boil. Cook potatoes until fork-tender, about 15 minutes.
- Use a slotted spoon or hand-held strainer to transfer cooked potatoes to a shallow bowl or serving dish. Reserve hot cooking water. Top potatoes with butter, Parmigiano Reggiano, salt and pepper. Use a fork to smash the potatoes, adding cooking liquid as necessary to make potatoes as creamy as you like (I usually add about a ½ cup total). Taste and adjust seasoning if necessary. Sprinkle fresh chives over top and serve.

Best Buttermilk Biscuits
Source
Ingredients:
- 2 cups all purpose flour, spooned into measuring cup and leveled-off
- 1/4 cup cornstarch
- 1 tablespoon baking powder
- 1/4 teaspoon baking soda
- 1 tablespoon sugar
- 1-1/4 teaspoons salt
- 1/2 cup (1 stick) cold unsalted butter, cut into 1/2-inch chunks
- 2 tablespoons cream cheese
- 3/4 cup buttermilk
Instructions:
Preheat the oven to 425ºF.
- Line a baking sheet with parchment paper.
- In the bowl of a food processor, combine the flour, cornstarch, baking powder, baking soda, sugar and salt. Pulse a few times to mix.
- Add the butter and pulse until the mixture resembles coarse sand. Add the cream cheese and pulse a few times until incorporated with a few pea-sized pieces of cream cheese intact. Transfer mixture to a mixing bowl.
- Add the buttermilk and stir with a spoon until dough comes together into a craggy mass. Do not over-mix.
- Turn the dough out onto a lightly floured work surface. Dust the top of the dough with a bit more flour and bring together gently into a loose ball. Pat the dough into a 3/4-inch thick rectangle.
- Using a sharp knife, cut the dough into thirds. Stack the pieces on top of one another and pat out into a 3/4-inch thick rectangle again, flouring the surface lightly as needed to prevent the dough from sticking.
- Cut the dough into thirds again. Stack the pieces on top of one another and pat into a rectangle with a final thickness of about 1/2-inch.
- Dust the blade of a sharp knife with flour and cut the dough into twelve even squares. Transfer to the prepared baking sheet and bake for 12-15 minutes, until the biscuits are lightly golden on top and a deeper brown on the bottoms. The biscuits are best served warm out of the oven, though a few minutes in the oven will revive slightly older biscuits.
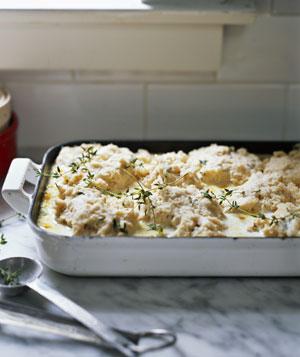
Savory Corn Cobbler
Source
Ingredients:
- 12 tablespoons unsalted butter, plus more for the dish
- 1 jalapeno, minced
- 4 scallions, sliced
- 1 cup whole milk
- 4 cups fresh or frozen corn kernels
- 1 cup low-sodium chicken broth
- 1 ½ teaspoons kosher salt
- ¼ teaspoon black pepper
- 1 ½ cups heavy cream
- 2 cups flour
- 1 tablespoon baking powder
- 1 tablespoon fresh thyme or 1 teaspoon dried
Instructions:
Heat oven to 375° F.
- In a skillet, over medium heat, melt 2 tablespoons of the butter. Add the jalapeño and scallions. Cook for 3 minutes. Add the corn and broth. Increase heat to medium-high and cook for 4 minutes. Turn off heat. Stir in the cream, 1 teaspoon of the salt, and the pepper. Pour into a buttered 9-by-13-inch baking dish.
- In a large bowl, combine the flour, baking powder, and the remaining salt. Using 2 knives or your fingertips, add the remaining butter, cut into small pieces. Mix until it resembles crumbs. Stir in the thyme and milk. Drop heaping spoonfuls of the batter on top of the corn mixture. Bake for about 50 minutes. Garnish with fresh thyme, if desired.

Herb Stuffing
Source
Ingredients:
- 3 cups low-sodium chicken broth
- ¾ cup (1 ounce) dried porcini mushrooms, roughly chopped (optional)
- 2 tablespoons olive oil or unsalted butter
- 2 medium yellow onions, diced
- 1 ½ teaspoons kosher salt
- ¾ teaspoon black pepper
- 2 stalks celery, diced
- ¾ cup fresh flat-leaf parsley leaves, finely chopped
- 2 tablespoons chopped fresh dill
- 1 ½ baguettes, left on the counter overnight to dry and cut into 1/2-inch pieces (10 cups)
Instructions:
- In a saucepan, bring the broth and mushrooms (if using) to a boil. Remove from heat. Meanwhile, in a large skillet, over medium-low heat, heat the oil or butter. Add the onions, salt, and pepper. Cook for 8 minutes. Add the celery and cook for 7 minutes and then add the parsley and dill.
Heat oven to 375° F.
- Place the bread in a large bowl. Add the onion mixture and the broth and mushrooms (if using) and combine. Transfer to a 9-inch square or 11-by-7-inch baking dish or the cavity of the turkey (see Tip below).
- Bake the stuffing for 25 minutes. If you prefer a soft stuffing, cover the dish with foil while baking. If you prefer a crusty stuffing, bake uncovered. (You can cover and refrigerate the uncooked stuffing for up to 24 hours. Bake as directed, adding 10 minutes to the baking time.)
Dessert

Perfect Apple Pie
Source
Ingredients:
Crust
- 2-3/4 cups all-purpose flour, spooned into measuring cup and leveled with a knife
- 3 tablespoons sugar
- 1 teaspoon salt
- ¼ teaspoon baking powder
- 14 tablespoons cold unsalted butter, sliced into 1-inch pieces
- ¼ cup cold vegetable shortening, in 4 pieces
- 7 tablespoons ice cold water
For the Filling
- 3.5 pounds baking apples (see note), peeled, cored, sliced ¼-inch thick
- 1 teaspoon lemon zest and 1 tablespoon lemon juice, from 1 lemon
- ½ cup granulated sugar
- 6 tablespoons packed dark brown sugar
- Heaping ¼ teaspoon salt
- ¼ teaspoon cinnamon
- 2 tablespoons all-purpose flour
- 2 tablespoons cornstarch
For Baking
- A beaten egg, cream, or milk, for brushing over crust
- 2 tablespoons granulated sugar, for topping the pie
Instructions:
Crust
- Combine the flour, sugar, salt and baking powder in the bowl of a food processor fitted with the metal blade. Pulse a few times to combine. Add the pieces of butter and shortening and pulse until the mixture is crumbly with lots of pea and chickpea-size clumps of butter and shortening within.
- Add the water and pulse until the mixture is evenly moistened and very crumbly. Dump the dough crumbles onto a work surface and divide into two piles, with one pile about 15% bigger than the other. Make two balls of dough and pat each one into a 5-inch disc.
Wrap the discs in plastic and refrigerate for at least 45 minutes.
- Take the larger disc of dough out of the refrigerator. Dust your work surface lightly with flour and place the dough on top; sprinkle a little flour over the dough. Use your hands to quickly knead the dough into a soft and malleable disc (don’t overwork it; you want it just supple enough to roll).
- Roll the dough, adding more flour as necessary under and on top of the dough so it doesn’t stick, into a 13-inch circle. Carefully drape the dough over the rolling pin and transfer it to a 9-inch deep-dish pie pan (at least 1-1/2 inches deep). Gently fit the dough into the pan, easing it inwards rather than stretching it outwards. Trim the edges to 1/2 inch beyond the lip of the pie pan. Turn the edges under to create a rim on the crust. Press the rim against the lip of the pan, forming it into an even edge. Use any scraps to patch in any tears or thin areas. Place the crust in the freezer for at least 15 minutes while you heat the oven.
Preheat the oven to 375°F. Set an oven rack in the middle position.
- Remove the pie crust from the freezer and place on a baking sheet (this makes it easy to move in and out of the oven). Cover the crust with a piece of parchment paper and fill it with dried beans or pie weights. Bake for 20 minutes. Take the crust out of the oven; remove the parchment paper and beans/pie weights and tent the edges with a few strips of aluminum foil. (The foil will protect the edges from getting too dark.) Bake for another 20 minutes, until the dough is dry and golden. Don’t worry if the bottom puffs up; just press it down gently with a flat spatula, such as a pancake turner, taking care not to puncture it.
Increase the oven temperature to 425°F.
For the Filling and Baking
- Meanwhile, combine the apples, lemon zest, lemon juice, granulated sugar, brown sugar, salt, and cinnamon. Toss until the sugar is dissolved and the apples are evenly coated. Let sit for at least 30 minutes.
- Drain the apples, collecting the syrupy juice in another bowl. Pour the syrupy juice into a 2-cup microwave-safe liquid measuring cup. Take note of the quantity and then heat on high power in the microwave, checking frequently, until the syrup is reduced by half. This will take about 4 minutes but keep a close eye on it as all microwaves are different. You don’t want to cook it for too long, or it will turn into sticky caramel (see note below on how to correct this if it happens). The syrup should be just slightly thickened and still pourable. (Alternatively, you can boil the juices in a small pan on the stove.)
Add the syrup back to the apples, along with the flour and cornstarch; toss to combine.
- Take the other piece of dough out of the fridge and roll into an 11-inch circle, using the same process described above. If necessary, use a little dough to patch up any holes in the bottom crust. Add the apple filling to the baked pie shell, compacting the apples as tightly as possible. (Too many air pockets will cause the crust to dome, creating a gap between the apples and the crust.) Place the rolled dough over top. Crimp the edges with a fork or flute with your fingers, sealing the top and bottom crust together. Work quickly, dusting your fingers with flour as necessary, as the heat from the pie pan will soften the dough.
- Brush the top crust with the beaten egg (or cream or milk). Sprinkle the remaining 2 tablespoons sugar over the top crust. Cut a few slits in the top crust to allow the steam to escape.
Bake for 15 minutes, then reduce the heat to 375°F.
- Bake for an additional 45 minutes, or until the top is golden and the filling is bubbly. Let the pie cool completely on a wire rack before cutting, about 4 hours.
- Note: Be sure to use baking apples that hold their shape when cooked, such as Honeycrisp, Jonagold, Fuji, Granny Smith, or Golden Delicious. And use a mix of different varietals for the best flavor.
- Note: If you accidentally over-reduce the syrup and it seizes up when you pour it over the apples, transfer the apple mixture to a large sauté pan and cook over high heat until the caramel melts. Let cool completely in the fridge before proceeding with the recipe.

Perfect Pumpkin Pie
Source
Ingredients:
For the Crust
- 1-1/2 cups (6-1/2 ounces) all-purpose flour, spooned into measuring cup and leveled with a knife
- 1 tablespoon sugar
- 1/2 teaspoon salt
- 1/8 teaspoon baking powder
- 6-1/2 tablespoons cold unsalted butter, sliced into 1/4-inch pieces
- 2-1/2 tablespoons cold vegetable shortening, in 4 pieces
- 4 tablespoons ice cold water
For the Filling
- 1 (15 ounce) can pumpkin (about 2 cups)
- 1 large egg
- 3 large eggs yolks
- 1/2 cup granulated sugar
- 1/2 cup light brown sugar
- 2 tablespoons all-purpose flour
- 1/2 teaspoon salt
- 1 teaspoon ground cinnamon
- 1 teaspoon ground ginger
- 1/2 teaspoon ground nutmeg
- 1/8 teaspoon ground cloves
- 1/8 teaspoon ground black pepper
- 1-1/4 cups evaporated milk
Instructions:
- Combine the flour, sugar, salt and baking powder in the bowl of a food processor fitted with the metal blade. Pulse a few times to combine. Add the pieces of butter and shortening and pulse until you have coarse crumbs with lots of pea and chickpea-size clumps of butter and shortening within. Next, add half of the water and pulse a few times to incorporate. Add the remaining water and pulse until the mixture is just evenly moistened and very crumbly. It will not come together into a mass — that’s okay. Dump the crumbly dough out onto a work surface and gather it into a ball. Pat the dough into a 5-inch disc — don’t worry if the edges crack — and wrap it in plastic. Refrigerate for at least 45 minutes to rest.
Take the dough out of the refrigerator
- (if it was in the fridge for a long time, let it sit on the countertop for 10-15 minutes so that it’s malleable enough to roll). Dust your work surface lightly with flour and place the dough on top; sprinkle a little flour over the dough. Use your hands to quickly work the dough into a smooth disc — don’t over-work it or warm it up too much, just smooth the edges as best as you can so it’s easier to roll. Roll the dough, adding more flour as necessary under and on top of the dough so it doesn’t stick, into a 13-inch circle. Carefully drape the dough over the rolling pin and transfer it to a 9-inch deep dish pie pan (it should be at least 1-1/2 inches deep). Gently fit the dough into the pan, easing it inwards rather than stretching it outwards. Don’t worry if it tears, just patch it right back up. Trim the edges to 1/2-inch beyond the lip of the pie pan. Turn the edges under to create a rim on the crust (you can use the scraps to patch in any thin areas); then press the rim against the lip of the pan, forming it into an even edge as you go. Using your fingers, crimp the rim. Place the crust in the freezer for at least 15 minutes while you heat the oven.
Preheat the oven to 375°F.
- Remove the pie crust from the freezer and place on a baking sheet (this makes it easy to move in and out of the oven). Cover the crust with a piece of parchment paper and fill it about halfway full with dried beans or pie weights. Bake for 20 minutes. Take the crust out of the oven; remove the parchment paper and beans/pie weights and tent the edges with a few strips of foil folded in half lengthwise. This will protect the edges from getting too dark. Bake for another 20 minutes, until the dough is dry and golden. Don’t worry if the bottom puffs up; just press it down gently with a flat spatula, such as a pancake turner, taking care not to puncture it. Remove the foil but don’t throw it away; you may need it again.
Reduce the oven temperature to 325°F.
- Make the filling by whisking together all of the ingredients in a large bowl. Pour the filling into the pre-baked crust. Bake for 50-60 minutes, until the filling is just set — it should look dry around the edges and the center should jiggle just slightly if you nudge the pan. Keep a close eye on the pie as it bakes; if ever the crust looks like it’s browning too quickly, tent the edges again with the foil strips. Cool the pie on a rack (leave it on the baking sheet) to room temperature, a few hours. Slice or refrigerate until ready to serve.
- Make ahead tips: Pumpkin pie can be made one day ahead of time and refrigerated. The dough can be made ahead and wrapped in plastic and refrigerated for up to 2 days, or frozen for up to 1 month. If you freeze it, thaw it overnight in the refrigerator.
- Note: If you use a store bought crust, follow the instructions on the package for blind baking.

Flourless Chocolate Cake
Source
Ingredients:
- 1 cup (2 sticks) unsalted butter, cut into pieces, plus more for the pan
- ¼ cup unsweetened cocoa powder, plus more for the pan
- 1 ¼ cups heavy cream
- 8 ounces bittersweet chocolate, chopped
- 5 large eggs
- 1 cup granulated sugar
- ½ cup crème fraîche or sour cream
- ¼ cup confectioners’ sugar, plus more for dusting
Instructions:
- Heat oven to 350° F. Butter a 9-inch springform pan and dust with cocoa powder.
- In a medium saucepan, heat the butter with ¼ cup of the heavy cream over medium-low heat until the butter is melted. Add the chocolate and stir until melted and smooth; remove from heat.
- In a medium bowl, whisk together the eggs, granulated sugar, and cocoa powder. Whisk in the chocolate mixture.
- Transfer the batter to the prepared pan and bake until puffed and set, 35 to 40 minutes. Let cool in the pan for 1 hour. Run a knife around the edge of the cake before unmolding.
- Using an electric mixer, beat the remaining 1 cup of heavy cream with the crème fraîche and confectioners’ sugar until soft peaks form. Dust the cake with cocoa (or confectioners’ sugar) and serve with the whipped cream mixture.